Fitting - it involves
all my vice-grips, much pensive staring, and the occasional band-aid. But at some point, you must start gluing
things down and hope that the fitted was sufficient, which it never is…
During the staring part, I noticed
that the inner fenders (or wings, whatever - we’re going American in this
paragraph) did not meet the lip of the actual fender. I tried voracious vice-gripping with my
biggest pair to force the gap closed, but it didn’t work, and through much failure,
I have learned that forcing things means something is wrong. More staring…
The clue was the difference in the
gap between the radiator support and the front frame rails on each side. The
passenger was lower than the driver. As
the fiddling continued, I found that by lowering the driver side a bit while
raising the passenger side a smidge, closed the gap between the driver side
inner fender and the driver side fender and significantly shrunk the gap on the
passenger side. Lo, the pics.
 |
| I placed my small square on the gap to show the "fixed" spacing. |
Got it - clamp down the driver side of the radiator support and stuff some wooden spacers in the passenger side (again, the pics). Done! I fabbed up some nifty sheet-metal angle brackets and went awelding. The Rootes Group didn’t connect the radiator support to the frame rails, but I couldn’t see another way to fix the gap issues. I may grind them off once the entire snoz is glued in place, but for now, all is aligned!
 |
| Angle bracket in the wrong place |
Or so I thought until I slid the valance
and chin back in place to check the fit - more exasperated staring...
The passenger side of the valance
was lower than the driver side, but why?
Looking straight on, I could see the driver side bolt hole where the
bumper mounts but not the hole on the passenger side.
After much discussion with my bewildered dog, I eventually noticed that
the bracket that attaches the valance to the radiator support required much violent
vice-gripping to meet the radiator support.
Seems I said something about forcing things...
While the vertical spacing of the
radiator support was correct, the horizontal spacing was too far back, toward the
fire wall, so that when I vigorously vice-gripped the valance bracket to the
radiator support, it pulled down the valance.
Egads, Watson…
So… I cut through my nifty angle pieces holding the radiator support, fabbed some new ones, and clamped them in at the same vertical height but moved the support forward so that it met the valance bracket and fixed the valance sag! I will leave it to your imagination how much time the events of the last three paragraphs took.
 |
| Corrected place, welds ground, self-etch primed |
Never enough fitting!
 |
| Valance bracket glued to the rad support. Yeah, Rootes put them in crooked - I looked a lots-o-pics. Makes the OCD twitch, doesn't it? |
 |
| Inner cheek, right? What else do you call it? |
I pounded out the upper and lower replacement pieces for the driver side and the lower piece for the passenger side, using the
rusty old ones as patterns. When I was
prepping the snoz, I welded in the upper and lower on the driver side, but only
the upper piece on the passenger side. I
was worried they wouldn’t fit, that I had jumped the gun a bit, so I held off
welding the lower piece on the passenger side.
Turns out, it was smart to
wait. (Yes, I did something smart the
first time – I pause for adulation.) With
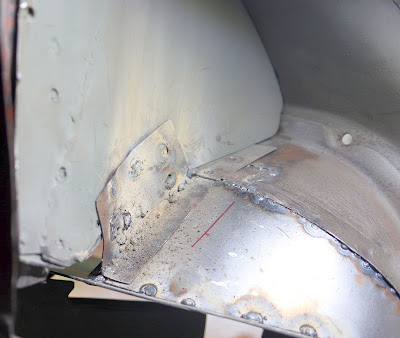
the valance in place, I matched the inner cheeks on both sides and glued them
down to valance and to the support braces on the inner fender. Lo, the pics!
 |
| Inner cheek glued down with JB Weld on the seam. I'll clean it up when I do the finish body work. |
 |
| From inside the fender well. Glued but not ground nor primed |
 |
| Lip Replacement (bottom) and other piece, ready for gluing |
 |
| Not the prettiest weld ever burnt, but it works |
 |
| Glued in! There will be finishing work, as you can see. |


No comments:
Post a Comment