It’s been a minute, but here’s what I’ve been up to.
Disc Brake CalipersIt might surprise you that sixty
years, with however many of them spent outside or in various soggy environs,
can grow gobs of rust, shocking I know.
Alphie’s calipers were pretty much frozen with rust, but the Organ Donor’s
were abjectly fossilized.
 |
| Rusty with one piston freed. The other piston is solidly stuck! |
With enough leverage and skinned
knuckles, I was able to pry Alphie’s calipers apart. And I thought I would break down the Organ
Donor’s for extra parts, at least for the bolts, silly man. But no amount of force was breaking apart
what chemical reactions had welded together.
The Organ Donor’s calipers are ballast at this point, blunt murder
weapons.
The hardest part was freeing the pistons from their holes. As you may know, whereas modern disc brakes use floating calipers (meaning they slide on pins, allowing them slide back to center after each peddle push), Alpine calipers are fixed using a piston on each side of the disc with a balance port between the caliper halves to equalize the hydraulic pressure, which is how they re-center.
Now, if a piston is stuck, you can use air pressure to push it out. BUT after one piston busts loose (which it did rather violently, making one Alpine mechanic jump a wee bit and make noises), the other piston stays comfortably snug in its hole. The air pressure now simply vents out the hole where the freed piston once lived.
I tried various methods of holding
the free piston in place to get air pressure to the other side, but to no
avail. Finally, and because I could see
that the old pistons were manky and because I could order shiny new stainless-steel
ones, I decided that drilling a hole in the stuck ones (remember, there are two
calipers) and tapping them with threads offered the best chance to free them
from fossilized bondage.
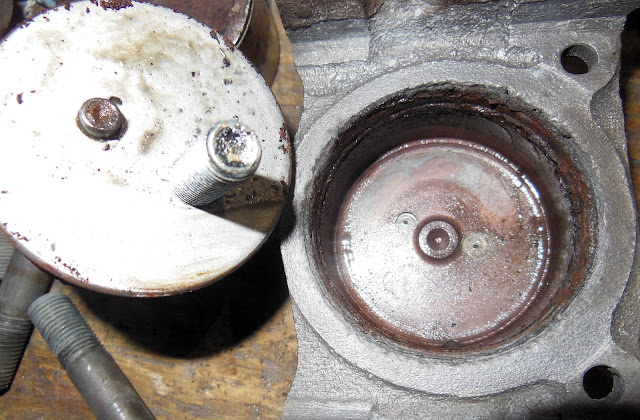
 |
| I drilled and tapped threads in the hole. A bolt pushed the piston out where nothing else would |
My concern was that I would 1) drill
through the piston and into the caliper wall, 2) strip the threads, requiring
me to drill bigger holes and 3) muck up the bottom of the piston holes with a
bolt pushing out the stuck piston. As it
happens, 1) I didn’t drill into the caliper wall because I was watching it very
closely, 2) the threads held dutifully, and 3) neither the drilling nor the
bolt pushing against the caliper wall mucked up anything. Go team me!
 |
| I sacrified the piston, but there's only a small scar on the caliper bottom |
With lots of bead blasting, powder coating and cast-iron paint (because the color of the cast aluminum powder was too bright for my tastes), the calipers are happily clean and ready for new pistons and gaskety sealy parts. (The shiny ss pistons are backordered, but when they get here, everything will be spanking!)
Brake Servo
Power Brake Booster for my American
readers. Brake fluid is icky stuff; it corrodes
almost everything it contacts, collects water, turns to jelly, and generally
makes a bloody mess. Tearing down the servo
takes many rags and a few spray cans of brake cleaner.
Just a heads-up, there’s a big
spring in the can part of the servo that, when you loosen the last screw on the
backing plate, will shoot everything out the back, making your favorite
mechanic jump and make noises, again, just FYI.
And there’s usually loads of smelly old brake fluid in there from
decades of leaking seals. It smells terrible too.
 |
| Grungy and gross, the dissambled parts of a Girling brake servo |
But the high-pressure control valve,
or more specifically the end plug behind the control valve, at the back of the
valve body was stuck like a mosquito in amber.
Soaking didn’t work. Spraying
copious WD 40 in it and on it didn’t work.
Brake cleaner didn’t work. Puffing
120 psi of air pressure, nothing. What
finally worked was gently slipping a very thin feeler gauge between the valve
body and the end plug O-ring braking the adhesion between the aluminum wall and
the O ring’s rubber, then pumping in lots-o-air
pressure finally blew it out. Oh, and
when it finally blew out, your mechanic jumped and made noises yet again.
 |
| Cleaned painted and powder coated parts with a (second) rebuild kit |
Another heads up, don’t cluelessly rip
out the big leather seal that seals around the can because the rebuild kits don’t
have a new one. (One should at least glance
through the rebuild kit before going at it.) I had to order a second much more expensive
kit that had a leather seal in it. Thanks Harmon Classic Brakes for having a kit with a leather seal. Eh,
live and learn.
 |
| Spanking! (We'll have to wait until I have Alphie running to know if it works!) |
Steering Box
Tearing down the steering box is simple
but be sure to count the ball bearings!
The bearings at the top and base of
the steering shaft are loose bearings that spray out everywhere when you take the
bolts out. I should have been expecting
it, but nope. I looked in the parts
manual to find out how many bearings went where. They’re a big pain to get back in too, just
FYI.
 |
| Dissasembled and cleaned |
 |
| Sporting some slick paint and powder! |
 |
| Sparkling and finally in its spot |
 |
| Installed and ready to impale |


