Tuesday, April 30, 2019

Deconstruction

Deconstruction... more like Demolition!

Gonna need some dental work!

Page Three - Alphie’s condition has worsened…

Busted Nose!

Earlier I mentioned that Aphie took a solid shot to the snoz, but further deconstruction shows the extent of the damage.  Call it a deviated septum, a TKO.  I have pictures!

Mashed Front Cowl

Mashed radiator and fender supports - inside right wing
Previous pictures show that the front cowl – the area in front of the radiator but beneath the hood where the hood hinges mount – is pretty bent, but with the radiator removed, you can see how mashed everything actually is.  Getting the hood to fit, the radiator at the correct distance, as well as getting the bodylines and gaps correct will be a task.

The radiator supports are mashed too.  Check out the pictures from under the wings (fenders, for you wankers).

I can – if I have to – fix the front valance, but I hope the donor car has a better one, or at least pieces I can combine with Alphie’s, a two-into-one deal.

Rocker Panels!

Deep rot on the passenger side rocker
Right, so I mentioned that sagging door openings hint at rocker issues…  Let’s look at the right rocker.  Cue the pics.  With the seats gone and the floor cleaned up a bit, you may notice, as I did, that the flat plate (13 - 15 gauge sheet metal, I’m estimating) that should be welded to the X frame is pretty much not there.  This plate extends down to the pinch weld line – in fact, it is what the inner and outer rocker panels are spot weld onto to create the pinch weld.

(BTW, the square stock bars welded across the door openings are to keep the door gaps uniform as I fix the rockers.  I welded those in before I started serious deconstruction, and yes, I measured divers (Britishism alert) times to ensure that the door openings are the same.)
You can see the ground where the passenger side rocker panel should be.
Michele's little piggies, btw.

No worries though, I have the left side for a pattern, the plate has no bends and I have solid X frame metal where I can weld the plate.

Once on the rotisserie, the rockers are the first order of business.

Floors


The floor pans are rubbish!  Even the panels that look solid are papery.  BUT I bought a set of Dave Lameront’s (in Ontario Canada) awesome replacement panels for a great price.  I’ll have to grind out the old panels and patch in some extra metal not covered by Dave’s panels, but the floors will be factory correct and solid!

The Quarters

From beneath, someone optimistically, 
perhaps desperately, slopped on some tar
Gaze upon some detail pics of the quarters.  Each quarter has problems, but the right rear has the most.  Fortunately, patch panels are readily available for these areas.  The panels will eat a chunk of the budget, but they will be easy to fit and weld.  I fear that the standard right rear patch panel won’t go far enough up the wheel opening to cover all of the damage.  Ebay may have a solution.  More on this problem when I get there.

Gas Tanks

The tanks are in good nick! Caught one break...
Yep, tanks, as in two of them.  The tanks and balance tubes…  OK, Sunbeam Alpines, beginning with the Series III, changed from a single tank mounted in the center of the trunk space to two tanks located in the rear wings and connected by a balance tube running directly behind the rear bumper.  So the tanks and balance tubes are in great shape – one tank has a dent on the side you can’t see.  I’ll fix it anyway.

Thirty-year-old gas really stinks, just saying!

Rear Suspension

Removing the rear suspension was straightforward – except, be sure to prop something under the front suspension cross member, because with four jack stands under the X member (pic), the weight of the rear suspension keeps things balanced.  Fortunately, I removed the rear leaf spring shackles first and lowered the suspension a little to get a better look at the front leaf spring attachments.  Luckily, I was not under the car when I lowered it because I noticed light between the two rear jack stands and the X member - Alphie was tipping forward!

I quickly jacked the front end and put my dirt bike stand under the front cross member to prevent Alphie from pitching over on her chin! 

The leaf spring attachments are mostly solid, but I noticed some flaking on a support piece at the left front leaf spring attachment.  I’ll need to recreate that piece with new metal.

Exhaust System

The entire exhaust system, save the manifold is Swiss cheese.  Note the pics.  Several LBC (Little British Cars) parts suppliers sell complete stainless steel exhaust systems so Alphie’s getting one.

Windshield Frame

This will require some tricky fabrication -
 trial and error, mostly error

Alphie is cutting me no slack – every place where Sunbeams are famous for rot, Alphie has it.  The bottom rail of her windshield frame is powdery.  AND, of course, the bottom rail has the more curves and width changes than any other side of the frame.  A fabricating challenge, but it’s later on the schedule.

Rusty Fasteners

This side will give me some measurements 
for the other side
Bless the British engineers’ hearts (here in the South, that means I’m about to trash them) who seem enamored with flat head screws with open nuts, rather than Philips head screws (at least, hex bolts would be lovely) and welded nuts.  You cannot get any torque on a rusty flat head screw, especially when you are curled pretzel-like trying to hold a spanner on the open nut to which it is rusted.  (Bonus point for not ending that sentence with a preposition!)

Similarly, please provide enough room between hex-head bolts/nuts and surrounding metal to allow sockets or boxed end wrenches to fit over the hex-head.  Open-end wrenches love rounding the pretty corners off bolts and nuts when you lean on them.  I’ll weld in course thread nuts where I can too.
Also, what’s with all the fine threads?!

Bolt Depot will soon log an order for stainless flange bolts, socket (Allen) button head screws and Philips head screws. 
Former Mouse House, bottom right corner

Evictions

Alphie is free of all rodent infestations and habitats!  The garage smells better too.


Wednesday, April 3, 2019

Alphie has Cancer!


An advanced case of Rocker Rot - Stage Four Cancer!

Page Two - Diagnostic Surgery

I inspected Alphie carefully when I bought her, and I knew she had cancer.  Well, it turns out to be stage four!  It was obvious that she took a bunch of fives (my Britishism gem for this page) to the nose at some point, and someone did some solidly dodgy bodywork… But. My. Word!

Blobs-O-Bondo

The previous surgeon apparently fancied himself a Bondo artist.  About 80% of the body sheet metal has a slathering of plastic under the paint.  It already weighs less from the Bondo shedding.

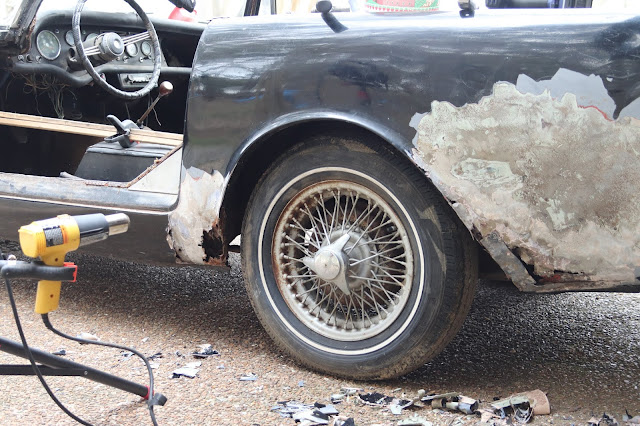
The right wing (fender to us Yanks) had plastic filler a half inch thick in some places.  Other affected areas had metal tears that went un- welded; missing spans of sheet metal that were covered with aluminum foil tape and Bondoed; fender lips that have no metal, just plastic clumps sanded to shape.  He used some patch panels but they were riveted and summarily coated.  The ninny even sculpted the gaps between the hood and fenders!

Apparently, there were wads of wood screws laying around.  They’re used everywhere.

It gives a poor body man pause…

Diagnostic Report:

Alphie’s bod is in bad nick.

Alphie's bloody nose.

The Nose – The right front fender is gangrenous, necrotic; we’re looking at amputation.  The fender crown has compressed, wrinkled metal that makes it just a wee shorter than the other side.  The jab to the nose bent the radiator support and tore it from other body panels in places.  The metal that supports the hood hinges and funnels air to the radiator looks like a crumpled piece of foil.  The lower valance is torn in several places and must be cut from the car to be repaired.

To my despair, our previous surgeon Bondoed over trim clips, screw heads, rust, emblem attachment holes – he even left un-sanded clods of Bondo that dripped onto the valance panel.  Gobsmacked!

The Rockers – I noticed when I was buying it that the passenger door rubbed against the rear of the door opening – I also knew that sagging door opening means Rocker Rot – and now I know where the biggest tumors were hidden. 

Quick Side Note:  Alpine rockers consist of three metal sheets: 
·       The first sheet, and the innermost one, is a flat sheet welded to the big X shaped crossbeams that make up the frame.  This sheet creates the pinch weld line under the car. 
·       The second is the “inner” rocker with bends for strength, runs from the door opening down and is welded to the pinch weld line created by the first sheet.
·       The third sheet, the “outer” rocker that shows, is rounded to match the bodylines and is also welded to the pinch weld.

I said I wanted a challenge!

The upper sections of all three rocker sheets are solid, but the lower sections are tattered with rust.  The driver’s side has more metal left than the passenger side.  Fortunately, there is enough metal for good welds once the rust is blasted and treated. 

The Front and Rear Quarter Panels – Each quarter panel has a rust hole, the driver’s side panels have bigger ones.  The left rear, however, has lip rust that goes most of the way up the edge of the opening.

Floor Panels – Lots-O-Rust!  I’ll need to locate replacement panels.  They exist, but it’s going to take some sleuthing.
Trunk Floor – The trunk floor is only rusted at the rear so I won’t need a complete replacement panel.  That will save several quid.

What’s to be Done?!

I have a MIG welder, and I’m not smart enough to know that I can’t fix all this!

What was not under the Bondo? Metal!

Donor Car!

Me mate who sold me the car offered a 1964 Alpine in Kentucky as a donor car.  I haven’t seen it yet and don’t know much about it, but it’s bound to have usable bits.  I’m making arrangements to run fetch it sometime in April.
Anything I can cut from the donor is money I won’t spend.  I hope it has an unviolated snooze.

Bending and Welding

I was hoping to get some welding practice, and it looks as though I’ll get it in spades!  I bought a metal brake and set up a metal fabrication workstation – it even rolls.  Once I have Alphie stripped down to a shell, I’ll whack together a rotisserie so I can get to her underbelly and start blasting, bending and welding.  The rotisserie will have wheels so I can move it in and out of the garage.
Much of what’s got the ROT, I can bend-up and weld-in!

More unhealthy metal

Blasting

Since there are rust tumors everywhere, Alphie will need a good blasting.  At first, I thought of having the shell blasted at once, and then get to mending.  I have decided that it will be more cost effective to buy a pressurized (outdoors) media blaster and blast areas as I attack them.  With my own blaster, I can use aggressive media to blast areas with loads of rust, and soda to blast areas that have less (like the body surfaces).

Patch Panels

I will make the patch panels for the rockers because they are straightforward pieces with no compound curves.  The quarter panels are much harder to fabricate with compound curves and bends that must fit other panels’ curvature.  They are available, so Bob’s Your Uncle.