Monday, January 20, 2025

Page Fifty-Nine - The Nut Holding the Steering Wheel


(I’m the nut.)

Compared to the pics I have seen online, Alphie’s steering wheel is in pretty good nick, not to say that it’s in good shape.  Like most Alpine wheels, the Bakelite hub has a shrinkage crack running all the way down one side, a gaping chasm to be honest.

Explanatory Ramble:

Bakelite is a hard synthetic polymer that often uses wood flour as a filler (in the past asbestos was sometimes the filler, so be careful), which is hygroscopic, an impressive word that means it absorbs water from the air.  The wood flour expands and contracts with temperature and humidity changes, but Bakelite doesn’t.  Bakelite is hard, and if you have ever dropped it or tried to pry it lose, you know that it is quite brittle.  The metal hub under the Bakelite also expands and contracts with temperature, in short - expand/contract + hard and brittle = gaping fissures over time.

An unused NOS Alpine steering wheel left on a shelf these past 60+ years, would probably have some cracking.  Virtually all Sunbeamers face this problem.

Before - the parts at the start

Before - the warped and cracked original hub
with Eric's Restoration Hub*

Hub Restoration:

Method A: Head to your favorite home improvement store and get some JB Weld (the two-part putty version works best) and sculpt it like molding clay to fill the cracks and chipped off pieces.  Next, sand, file, refill, sand, file sand until you get it to shape and smooth.

Pros – cheap and readily available.  Cons – doggedly labor intensive and the results depend on your skills as a sculptor and how bad your hub was before you started.  Mine was warped off-center a bit, so the results would have only been “meh” at best.

Method B: Jump on the Sunbeam Alpine Owners Club of America’s (SAOCA) forum and find 65sunbeam (more on him below*); he sells a two-piece replacement hub made of Delrin, a far less problematic plastic used in a kajillion applications.

Pros – dead simple, looks brilliant and original.  Cons – a bit pricey.

I opted for Method B, and I think it’s more than worth the price. 

To close up the gap between the two pieces of the restoration hub,
I had to Dremel some cutouts to clear the steering wheel spokes.

I didn't get them perfectly aligned,
but they are mostly hidden under the horn ring anyway
Plastic Dying:

Bakelite fades to a weird brownish color over time and the steering wheel plastic had oxidized and had small spider webby lines running through it.  The interwebs says that India ink or leather dye work well as plastic dyes.  I do leatherwork, so leather dye it is.

The "test" cowl before dying.  The Bakelite turns a splotchy brown with age.

And leather dye is the bomb!  Check out the pics.

The unbroken cowl after dying and a light coat of clear paint.
It looks better than the pic shows. 
Bad photographer with a so-so camera.

I have a broken steering cowl (the casing where the turn indicator and overdrive switch mount), so I tested the dye on it.  It renews the Bakelite’s original black; the color looks great, but the shine is uneven.

On the unbroken steering cowl, I used leather dye but added a coat of clear paint to even out the shine, and with some shiny stainless screws, it looks spanking!

Steering Wheel:

First, I broke off the old Bakelite hub and sand blasted and painted the rusty steel hub underneath.

The plastic on the steering wheel itself, the part you grab, is more flexible than the hub, meaning it isn’t Bakelite.  I sanded it with 600 followed by 1000 grit sandpaper to remove what appears to oxidation.  It was a weird yellowish color. 

The rusty hub under the Bakelite hub
Alphie’s wheel only has one small crack, which I easily filled with a two-part epoxy.  I deepened the crack a bit with a small file so that the epoxy would have something to grip and be substantial enough to stay put, let it cure and sanded it smooth.

Bead blasted hub with Bakelite debris
The leather dye restored the color nicely, but like the cowl, the finish was uneven.  Curiously, the dye didn’t penetrate the epoxy leaving it clear, or at least, the color difference left the crack visible even though I can’t feel it.  I shot the wheel with some black spray paint.  I scrubbed the paint a smidge with a polishing compound and it evened out the shine.  It’s cracking! Much better than I had hoped – I love happy accidents.

The wheel had one crack, which I filled with a two-part epoxy.
(I painted the steel hub black too.)


Sanded and dyed.  Note that the epoxy didn't absorb the dye
the same as the wheel plastic - that's why I had to
apply a coat of glossy black paint.

The Horn Ring:

The horn rings - one with a good wire and bad everything else.
One with good everything else and a bad wire.

A case of combine and conquer.  The horn ring from the Organ Donor was broken, completely unusable, but it had a good wire.  Alphie’s was in decent nick, but someone cut the wire.  Easy enough fix – drill out the rivets and move the good wire to the good horn ring.

While I was mucking about, I bead-blasted all the parts that make the horn blow and repainted and shined up the horn ring itself, bada bing bada boom!

Before shot of the horn rings.
The yellow arrows show the rivets that must be
drilled out to remove and reattach the horn wire.

Cleaned, shined, and painted.
I used screws (stainless of course) instead of rivets
to reattach the wire and connector ring

*The Gibeaut Hub, A Rining Endorsement:

Eric Gibeaut, known as “65sunbeam” on eBay and the SAOCA forums, sells the restoration hub I used.  Eric put in the work to perfect his hub, which explains the price he asks.  The hub looks like it came with the car, uses metal threaded inserts for the screws, no short cuts, and is dead simple to install.  It’s better than new!  There is no better fix than Eric’s hub!

He offers a discount to SAOCA members, so message him on the forum.  Ebay requires fees, so it’s cheaper to go through SAOCA

An after pic of the wheel, horn ring and cowl.
So much better than I had hoped for!

A closeup of Eric's Restoration Hub in place.
The fit and finish are perfect!

A pic showing how well the steering wheel turned out.
Again, it looks better than the pic. The color is great, and it shines
without being too shiny - absolutely love it.


Thursday, January 2, 2025

Page Fifty-Eight - A Severe Case of the Runs


Geez, I hope this works!

It’s not just a run here or there, a few sags in the clear coat, it weeps like the audience when Bambi’s mother is killed, when Old Yeller dies, when Farris Bueller destroys the Ferrari… It’s bad!
It's hard to get a good pic of the runs.  Here's an attempt.
Like I said, they're bad.!
Original Plan:

Step 1: Gently sand down each run.

Step 2: Wet sand entire panels with 1000, 2000 and finally 3000 grit paper.

Step 3: Buff it to a deep radiant glowing shine!

Best laid plans, am I right?
Absolutely terrifying to take a razor blade to the paint,
but with some practice, I got better at it. 

After the scraping, I sanded it down with 220.
Now to fix the sand-throughs
New Much More Precarious Plan:

Step 1: Gently, carefully, meticulously, terrifyingly scrape each run down with a razor blade!

Step 2: Sand down the runs with Maguiar’s Unigrit sanding blocks (1000 grit followed by 2000).

Step 3: Sand everything flat with 600 grit.

Step 4: Cover spots where I ground through to the primer with leftover color coat, using a small foam brush.

Here's an example of a fill-in color coat "fix" - unsanded
Step 5: Wet sand the edges and bubbles in the fill-in color coat with 1000 grit because when I used 600 grit, it ground through to primer again!
Here's a couple of sanded fill-in color coat "fixes."
I'm praying they will blend when I spray clear coat over them!
Step 6: Fix all of Alphie’s runs because I’m bound to sand through to primer in other spots, which I already have in several spots, if you must know!

Step 7: (I haven’t done the next steps yet because I haven’t finished sanding through to the primer, er, I mean fixing the runs.) Respray clear coat (hopefully two coats) over each spot where I sanded through to primer AND PRAY IT MAKES MY “FIXES” DISAPPEAR! 

The doors, boot lid and bonnet lid will get complete clear coats while other places will only get spot resprays.

Step 8: Wet sand the entire car to 3000 grit

Step 9: Buff Alphie to a deep radiant glowing shine

One encouraging note – where I didn’t run the clear coat, it has sanded down brilliantly.

My first plan was decimated when it met reality as plans often do.  I’m about 89.9% sure that in the end, you won’t be able to tell where I “fixed” the runs, but I won’t know until Step 9, unfortunately.

If it doesn’t work, I’ll figure it out but until then, cross your fingers!  I’ll update the blog when I respray and sand out the clear coat and begin buffing.

Friday, December 6, 2024

Page Fifty-Seven - Can-O-Worms


Little multicolored wriggly worms!

Heard this one?  Always buy two MG’s, one to drive and one to fix.  Yeah, the one that wasn’t running had electrical gremlins from infamously sketchy Lucas wiring harnesses.  They came with factory shorts – apparently, Lucas was invested in the anger management industry.

“Sketchy” doesn’t sufficiently cover the state of Alphie’s original harness, maybe “tattered” to be polite, “f@#*!” to be accurate.  So, he gets a brand-new aftermarket-one-size-fits-several-models clean and pretty harness.

The problem is that the wires aren’t labeled (I don’t blame the wiring folks for that because some wires have many possible uses, depending on model and optional equipment), and the colors are about 93% (a completely made-up statistic) correct.  The connectors are mostly the right ones (another reason to keep old harnesses).

American companies use multi-wire plugs, which fit things like ignition switches, flasher units, relays, etc., and those plugs are configured so that they only fit the component they are meant to power.  You really can’t (although some have) attach a plug to the wrong component.  But our British cousins opt to plug each individual wire to a numbered post based on what appears to be a hand drawn wiring diagram for most, but not all electrical components, which, for we Sunbeamers, have been photocopied several blurry times from an oil-stained original, then scanned for extra blur, and printed quite small, but I digress…

That means I had to figure what wire went where, and you will too, good luck.

You will need:

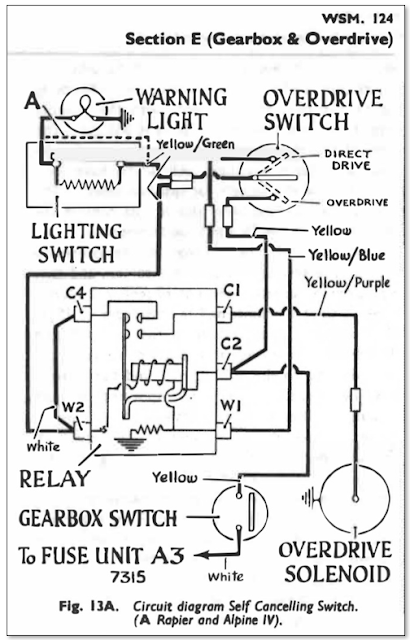
Wiring Diagrams: As many as you can find!  If you have a Series IV (like Alphie) get the Series V diagram too because late SIVs are very like SVs.  Find specific diagrams for things like the overdrive unit, reversing lights, amp meter etc.  Oh, and the heater isn’t on the main harness diagram because it was “optional” equipment, even though almost every Alpine came with a heater, so find the heater section in the workshop manual.    
Specifc digrams like this one for the overdrive unit are really helpful

Early Series IV’s had a fan switch on the “screen” (directional) heater control while later ones used a switch on the dash.  Eleven times out of ten, the heater control switches are broken so find a dash switch.  Some cars have two speed fans while others have a single speed.

The path to wiring bliss is crooked and confusing.  AND the positive earth thing wreaks havoc on American brains.

Multimeter: There are a lot of brown, white and red wires; you’ll need to know which ones connect to which.
A multimetter is absolutely needed and the label maker is really great

Old Wiring Harnesses: I have two complete (within reason) harnesses – DO NOT THROW THEM AWAY!
This one of my two old harnesses, the other one is off the dash.
I referred to it MANY time!

Soldering Iron, Shrink Wrap, Connectors: Really, the new harnesses are great, but I found several instances where a spade connector needed to be a bullet connector, or a small spade connector needed to be a large one.  You will need to make some adapters and jump wires too.  I had to repair the overdrive and dynamo (generator) harness because it had become brittle, and I’m sure there are other sub-harnesses that will need repair too.
The overdrive wiring sub-harness is particullarly confusing
The dynamo (generator) sub-harness is ready for action

Flashlight and a Magnifying Glass: For eyes that ain’t what they use to be.  The little numbers for the switch posts are very small.

Label Maker: Or at least some tape and a marker.

A Computer: You’re going to the forums, you’re not that good.  There are some very useful color-coded wiring diagrams out there.

Pictures: Before you yank out the old harness, take lots of pictures.  If you think you’ve taken enough, go take ten more!  (I hope you haven’t yanked it without taking pics.)
Take many pictures like this!  You haven't taken enough!
BTW, this one isn't that great.
Patience: It took much longer than I expected!

I have said before that sequencing is a special problem when restoring dead automobiles.  My original plan was to wire up everything on the dash and install the dash and harness in one assembly.  BUT you can see from the pics that everything gets dusty as I work on other things.  I didn’t want to muck up the dash, especially when I install the dash pad and windscreen (windshield for the yanks).

It's now laid in place, and I’ll adjust its placement as I add engine bay components, lights, interior pieces and so on.

I just hope I don’t melt the whole shebang when I first connect it to a battery! (I've done some reading on this - the forum folk suggest using a battery charger on its low amp setting in place of a battery.  That way you don't pump in wire melting loads into a wiring harness you aren't 100% sure you hooked up correctly.  I'm agonna do that.)

Some New Stuff: Alphie is getting new recycled turn indicator and overdrive stalk (steering column) switches from Sunbeam Spares and a new remanufactured (read “reproduction”) cigar lighter from eBay.  Apparently, Sunbeam drivers sucked on stogies whilst touring the country instead of cigarettes, quite posh!

My new "cigar" lighter gets an extreme close up
mainly because I paid WAY too much for it.
These fit Jaguar XKEs so they claim heavy pounds!

New "recycled" indicator and overdrive switch, for which I also paid WAY too much. The arrow points to a stalk mounted horn switch*, so this switch came from some other Rootes product.
It only means there are two extra wires on it, but none of it can be seen 
*forum crowd sourcing informs me that the indicator stalk switch is from a MKII Tiger and is a dimmer switch rather than a horn switch.  It's a bit of a unicorn, so maybe I didn't overpay as much as I thought.

Okay, I spent a lot on three dash components (an embarrassing amount if I'm being honest), but the dash is one of the most visible parts of a car, it was not a place I was willing to spare expenses.  Alphie's dash will be a full-on, optioned-out, walnut version, with which no Alpine ever left the factory.  It's my build so hush.

(I know I said the next post would be about fixing runs in the clear coat, but it’s cold here in Alabama, so I opted for some inside tasks.  I’ll get to the paint runs - hold your horses!)

Tuesday, November 19, 2024

Page Fifty-Six: Blue Take Two


I tried this almost exactly a year ago and failed – miserably!

So, for Blue Take 2, I researched, talked to as many car folk as I could find, watched some You Tubes, did more research, talked to the guys at the paint store, twice, and finally figured out what I did wrong, I think, I hope.
Blue Take One - Fatal Error: You may recall that when I sprayed the color (base) coat (a year ago), it "pulled” the urethane primer under it (the color coat solvents soaked into the primer and disolved the primer, making it wrinkle). I was forced to fix all the wrinkled areas before shooting the second color coat.  That extended time between color coats was the fatal error.  The second color coat didn't chemically bond with the cured first coat. And since I didn't scuff the first coat, it didn't mechanically bond either.

(Small Explanatory Ramble: Paint sticks to itself in two ways, physically (or mechanically) and chemically.  Coats must be sprayed within a given timeframe for the succeeding coats to chemically bond to the previous coat.  If you spray another coat after the time elapses, you must roughen or "scuff" (usually with a Scotch pad) the surface so that the next coat will physically bond to the previous coat.  I should have scuffed every surface before spraying the next color coat.  I knew that, but didn’t think of it at the time, absolutely gormless!)

And you may recall, the areas with the second color coat, every-single-one, pealed off as easily as a days old sunburn.

The Fix: What did I do differently this time?  I sanded (how I love sanding!) every surface (except for the engine bay, interior and boot interior) back to metal and sprayed a two-part epoxy primer.  That was key!  No pulling the primer, by crikey!
Serendipitous Benefit: “There is a providence that protects idiots, drunkards, children, and the United States of America.” – Otto Von Bismarck
Since I had to sand every surface again(!), I took the time to closely examine my body work and found many places that were less-than-awesome.  I re-worked several areas that are now in much better shape than if I had succeeded with Blue Take One.  A costly way to fix the body work, but Alphie is better for it.  But still, it sucks to suck!

Blue Take Two sprayed like it was supposed to – smoothly without any wrinkling and every coat within the time frame!  Alphie now sports three base (color) coats and FIVE clear coats, boo frickin ya!

RUNS: So, what’s next?  Seems I ran the clear coat like Niagara Falls!  Next post will be about fixing (an embarrassing number of) runs in the clear coat.  Did I mention that I love sanding… so much... so fun...

A photo journal of the re-re-spray!
Epoxy Primer 


My wife was taking the pics so I snuck into a shot


I had the paint guys mix it "ready-to-spray"
so just stir a bit and spray


Lots of sitting down and getting up!

The base coat sprayed easily with no runs

An ugly art installation to be sure,
but hanging everything helped me paint all sides
It's very difficult to get a pic that shows how bad the runs are...
Let's just call them "cascading"

Thursday, October 3, 2024

Page Fifty-Five - Booty Baubles


Or Trunk Tools (‘Merican), or Accoutrement da Coffre de Voiture (French) or Thingos (Australian) – enough of that…

(By the way, I added a write up about the Trunk Kit, um..., Boot Kit in the “More Stuff” column to the right of the blog pages, check it out.)

As I was cleaning, powder coating and/or painting the “tire tools” - the lifting jack, “wheel brace” and starting handle – I wondered if any of the other tools were moldered at the bottom of the several boxes that came with Alphie.  Turns out, some indeed moldered.

I found the “Box Spanner and Tommy Bar," two of the “spanners,”  and, lucky for me, the tool roll in remarkably good nick!  I decided Alphie could not survive without the rest of his kit.

The Bits Clipped to the Boot Wall:  I bead blasted, painted and dipped all the clips in Plasti Dip, just so you’ll know.

This stuff looks just like the clips' original coating
Lifting Jack: (love this term!) Here in the colonies, we “jack up” a car, the “lifting” is implied.  Apparently one “lifts” a motor with a “lifting jack” in England.  Rootes gave us two variations, both made by Shelly in England: Series V Alpines got a 19” version painted grey, while Series I-IV got a 20” black version.  Oddly enough, I have one of each.

I suspect that many-a new Alpine owners stopped at a parts store on the way home from the dealership to grab a jack that was up to the task because these rickety little gems are not!  Both of mine were bent from probably doing what they were intended to do.

It would take a truly trepidatious roadside repair for me to trust a Rootes lifting jack.  On a flat and level concrete car park (parking lot), they are at best, wobbly.  Never get under a Sunbeam precariously teetering on a Roots lifting jack!  Mine is strictly for show; buy yourself a scissor jack at least.

I completely disassembled the black one, bead blasted it, straightened it (more work than it sounds), powder coated it, greased and reassembled it.  It’s better than it ever was, but still, don’t use these things!

Wheel Brace:  A thoroughly British term for tire (tyre) iron (pronounced “arn” in my neck of the holler) that I stumbled across that term while researching this dribble.  Yeah, I had never heard it called a “wheel brace” before.  Oh, it also serves as the lifting jack crank.

Again, the Rootes crew gave us two versions: the first had a smaller diameter.  Later Alpines got a thicker, presumably stronger one.  I have learned that some of the later ones were a bit longer too.  Mine appears to be the later version, but I don’t have an early version for comparison.

Starting Handle:  Across the pond, no (American) car (that I know of anyway) since the 1930’s included a starting handle for hand cranking/starting a car.  The Model T Ford famously would break arms if a hapless sap locked an elbow during cranking operations and it backfired.  The Alpine handle has a one-way engaging mechanism that releases if the crankshaft snaps backwards, but still, be careful.

All clipped in.  I'll update the pic with the hammer when it gets here.
Wire Wheel Hammer:  I have this on order from Classic Sunbeam, but I will never use it (at least to loosen knock-off spinners).  Made by Thor, the hammer either has two copper striking surfaces or one copper and one raw hide.  The variation seems to have been dictated more by supply than specification.  Early Alpines seemed to have the copper/copper hammer while later got the copper/raw hide ones.
I won't use it, but it's a nice banger

I will make a wooden “wrench” for my spinners.  I refuse to bang away on new (or re-chromed) spinners with a hammer!

Along with the kit clipped to the back wall of the boot, Rootes included a handy tool roll with an assortment of trinkets for your roadside emergencies.

The Tool (Kit) Roll:  The tool roll itself deteriorated quickly in many Alpine boots, so original ones in good nick are difficult to find.  Mine, however, was nearly pristine.  (Someone made reproductions in the past, and mine may be one of them, hard to say since there are no markings on it or the originals.)

Back with cotton tie strap

Inside - It folds and rolls like a burrito
A Tool Burrito

It has four sleeves, one of which is bisected by the heat weld for cotton tie strap on the back.  The smaller bits, the distributor key, tyre (tire) valve tool and valve gauge (feeler gauges to the Yanks) live in the smaller pockets.

Per usual, early Alpines got canvas tool rolls while later series got plastic ones, mine’s plastic.

Distributor Key:  Lucas combined a screwdriver and points gap gauge in a clever key shaped tool.  Riveted to the shank of the key is a pivoting gap gauge for gapping the points.  My first thought was that each corner of the key’s triangle top were different thicknesses, one .014” and the other .016” since that is how they are marked, but my micrometer says that both corners are .006” thick.  Maybe the .014” and .016” is so we can remember what the points gap and/or spark plug gap should be, dunno…

It's cute and clever, but not a great tool
Maybe not a trepidations roadside repair, but certainly a desperate one would see me reaching for the distributor key.  It’s cute, but not very effective, maybe as a points gauge, but I replaced the points in Alphie, so now it’s cute and obsolete.

Valve and Spark Plug Gauge:  Since the distributor keys is no good for gapping the spark plugs, Rootes tossed in a gauge for gapping spark plugs and valves.  It has three gauges, presumably, since I don’t have one and can’t check, the third gauge is the same as the points gap gauge.

I tossed in a small extra set of feeler gauges I had to fill in until I can find an original set.  I hear they are hard to find. 

Not original, but it will do for now

Tyre Valve Key: A little brass doohickey for unscrewing the Schrader valve in the tire valve.  Early Alpines were lucky enough to get a brass one, while later ones only merited a plastic one.  I got the brass one because, it’s brass and less likely to break or dry rot, besides, only the best for Alphie.

These are EASILY lost!
Spanner (Adjustable):  The brand is “King Dick,” that’s enough for me, Alphie needs a King Dick!  Mine is 6” long and apparently the Rootes kit had a less impressive 4” one, but like I said, Alphie needs a King Dick!

Six inches of KING DICK!
Pliers:  The TW (brand apparently) pliers has built-in wire cutters because there is a more than passing chance that Alpine drivers will need to do electrical repairs on the side of the road.

With the all-important wire cutters
Spanners:  There is some debate as to whether the kit had four or five spanners, four was apparently more common.  The “Superslim” (brand) spanners came in a bewildering array of sizes: British Standard Whitworth (BSW), British Standard Fine (BSF) (sized for the thread count fer cryin’ out loud), British Association (BA) and “Across Flats” (AF), sized by the distance between the flat areas of the wrench’s mouth, the American Way! 

SUPERSLIM spanners with all manner of size designations

Can you imagine screaming at someone to fetch you a 5/16 BSW 3/8 BSF (which are the same size, by the way) from under a car whilst shakily keeping the starter from smashing your nose?  Sheez!

The ones in the kits were AF: 13/16" x 11/16" - 3/4" x 5/8" - 11/16" x 19/32" - 9/16" x 1/2".  Two of mine are marked with BSW and BSF fractions (which I still have no idea which is the actual size!) so they are not original, but close enough.

Box Spanner & Tommy Bar: The box spanner is for removing and installing sparkplugs.  It’s a serviceable tool, but if not on the side of the road somewhere, use a regular spark plug socket.  The Tommy Bar is the little piece of steel rod used to twist the box spanner.

Gratuitous British Slang Tidbit:  The name “Tommy” came from German soldiers calling out “Tommy” across the trenches when they talked to a British soldier during WWI.  The name could have also adhered to the British from a Private named Tommy Atkins who after being terribly wounded supposedly said, "It's all right, sir. It's all in a day's work" and died shortly after.

Box spanner with a Tommy Bar
(short for British bar, apparently)
Screwdriver:  The kit came with a 10” wooden handled flat head screwdriver, much more effective for diddling with the distributor and points.  There was no brand name, and mine is neither the right size nor handle shape, but it will do until I find one that looks right.

My stand-in wooden handled screwdriver

The Strap:  I bought the stuff for a new strap, the cotton webbing, slide buckle and finishing clip.  I have the stuff for a 1 1/2" strap, but from the pics I've seen on the internet, it looks like 1" webbing.  More later.

The buckle is the wrong shape and the strap may be too wide, but...
Change of Plans
Change of Plans, at least for the strap. After looking at many boot pics in the interweb, I decided the original strap was probably a 1 inch strap.  So, I found some 1 inch end clips, a 1 inch buckle and rethought the strap. The buckle is still wrong, the original is a weird "H" shape deal and i have no idea what color the strap is.  A reproduction strap (no long available) I found online, is blacl, but the pics of (what I think are) original straps, they are dirty, but clearly not black.  The buckles and end clips are usually rusty, so I can't be sure if they were chrome, black or some other color.
A strapping young strap! (sorry:(

Other gadgets that came in some Sunbeam kits:  Differently equipped cars came with different tools.

Nave Plate Extractor:  A pretentious name for a piece of flat steel with a lip to remove the chrome wheel surrounds and hub caps.  Alphie had wire wheels so didn’t get one of these.

Oil Sump (plug) Wrench:  It’s just a ½” Allen wrench.  Some Alpines had recessed oil pan plugs.

Knock-Off Spanner: Some wire wheels had octagonal hub nuts (as opposed to winged hub nuts).

Grease Gun:  Yep, Series I & II’s got a grease gun to spread goo all over whatever was in the boot, in case, you know, you wanted to stop on the road somewhere for a quick regrease of the front suspension.  Makes you wonder why they stopped including these in the kits.

Stuff I Added: To recreate the authentic booty kit of 60 years ago, I threw in an extra set of points (because a bad set of points was often why you found yourself on the side of the road) and a spare spark plug, mainly because I had a 40+-year-old brand new one.