Monday, December 5, 2022

Page Thirty-Five - Hingey Bits: Doors, Boots and Bonnets


Alphie’s on the ground so time to reattach some appendages, but first I must treat some wounds and, of course, some cancer.

Bonnet

I have two bonnets to choose from.  The first, dubbed “Bonnet Pins,” has holes for hood (sorry, bonnet) pins that someone of yesteryear thought an Alpine needed.  Since Alpine bonnets hinge from the front, any air pressure that miraculously builds beneath it will only push the back of the bonnet up.  And with a little 1600 cc four-banger churning along, that kind of air pressure would only come from outsized weather phenomena.  My guess is that whoever was more concerned with a dodgy bonnet latch than blistering performance.

Bonnet pins on a Alpine are like a DVD rewinder...

The other bonnet has no holes, but suffers more from the lumps and cancer, which are less treatable, so I went with Bonnet Pins.

Bonnet Pins is a replacement, revealed by the cracking bright red lacquer paint beneath the black and the three holes for the Rootes Group badge at the front edge.  (Only early models – Series I, II and II - had bonnet badges.  Series IV and V moved the badge to a center bar in the grill opening.)  As it turns out, other than the pins, Bonnet Pins is in good nick, no dents with only some small issues on the underside.


Stripped, it all has to go!

The Fix

First up, to the metal!  I have my no-old-paint policy, but with the cracking lacquer it is even more important.  Lacquer paint is not very flexible and tends to shrink over time, hence the cracks.  And it will continue to shrink and crack beneath new paint, so I have to go to metal on the bonnet.  Quick fix here – heat gun, razor blade and 40 grit on the random orbital.  I got to the crannies with a 2” disc on my angled die-grinder.

The red paint is from early model Alpine

Second, filling the bonnet pin holes, which were drilled through the supports below the skin as well as through the outer skin itself.  A relatively simple fix: cut a small piece of 16-gauge sheet metal, hold it with a magnet beneath the hole in the support and weld away.  A quick grind, a dab of JB Weld and done.  Same for the holes in the outer skin, although I may not use JB Weld on the outer skin.

The grey blotches are JB Weld over the stress cracks
and welded up bonnet pin holes
Third – please pay attention when opening and closing your bonnet – I found stress cracks in the under-bonnet supports just aft of the hinges.  I think this is caused from twisting the bonnet by lifting or closing it using off-center pressure.  Lift the bonnet from the middle where the catch is and be sure there aren’t any obstructions when closing it.  The hinges should also move freely so there is no need for any pushing when closing.  And Blast It, DON’T DROP the bonnet to close it!  Oh, and I welded up the stress cracks by the way.

Doors

In this case, the passenger’s door – I haven’t got to the driver’s yet.  You will be underwhelmed to learn that Alpine doors grow cancer along the lower lip, partly because the drain holes get clogged but more from the lack of any semblance of factory seam sealing.  In the pics you will see that the length of the lower lip has effectively rusted through.  There are other issues: a rust through on at the lower front edge of the outer skin, a rust through on the inside upper front corner and a curious rust crack at the top inside corner at the back inside edge next to the window fuzzy.

The before shot, cancerous but not as bad as the rocker panels
The Fix

Grind on Macduff!  First, I ground off all the rust.  I used a cutting wheel on the 3” grinder and Dremel tool to get some clean edges where I can weld in some new 22-gauge sheet metal.  I used thinner sheet metal so I wouldn’t put much heat into the welding.  I’ll seal up the seams from the inside once I have everything welded and cleaned up.

Some close-ups on the rust
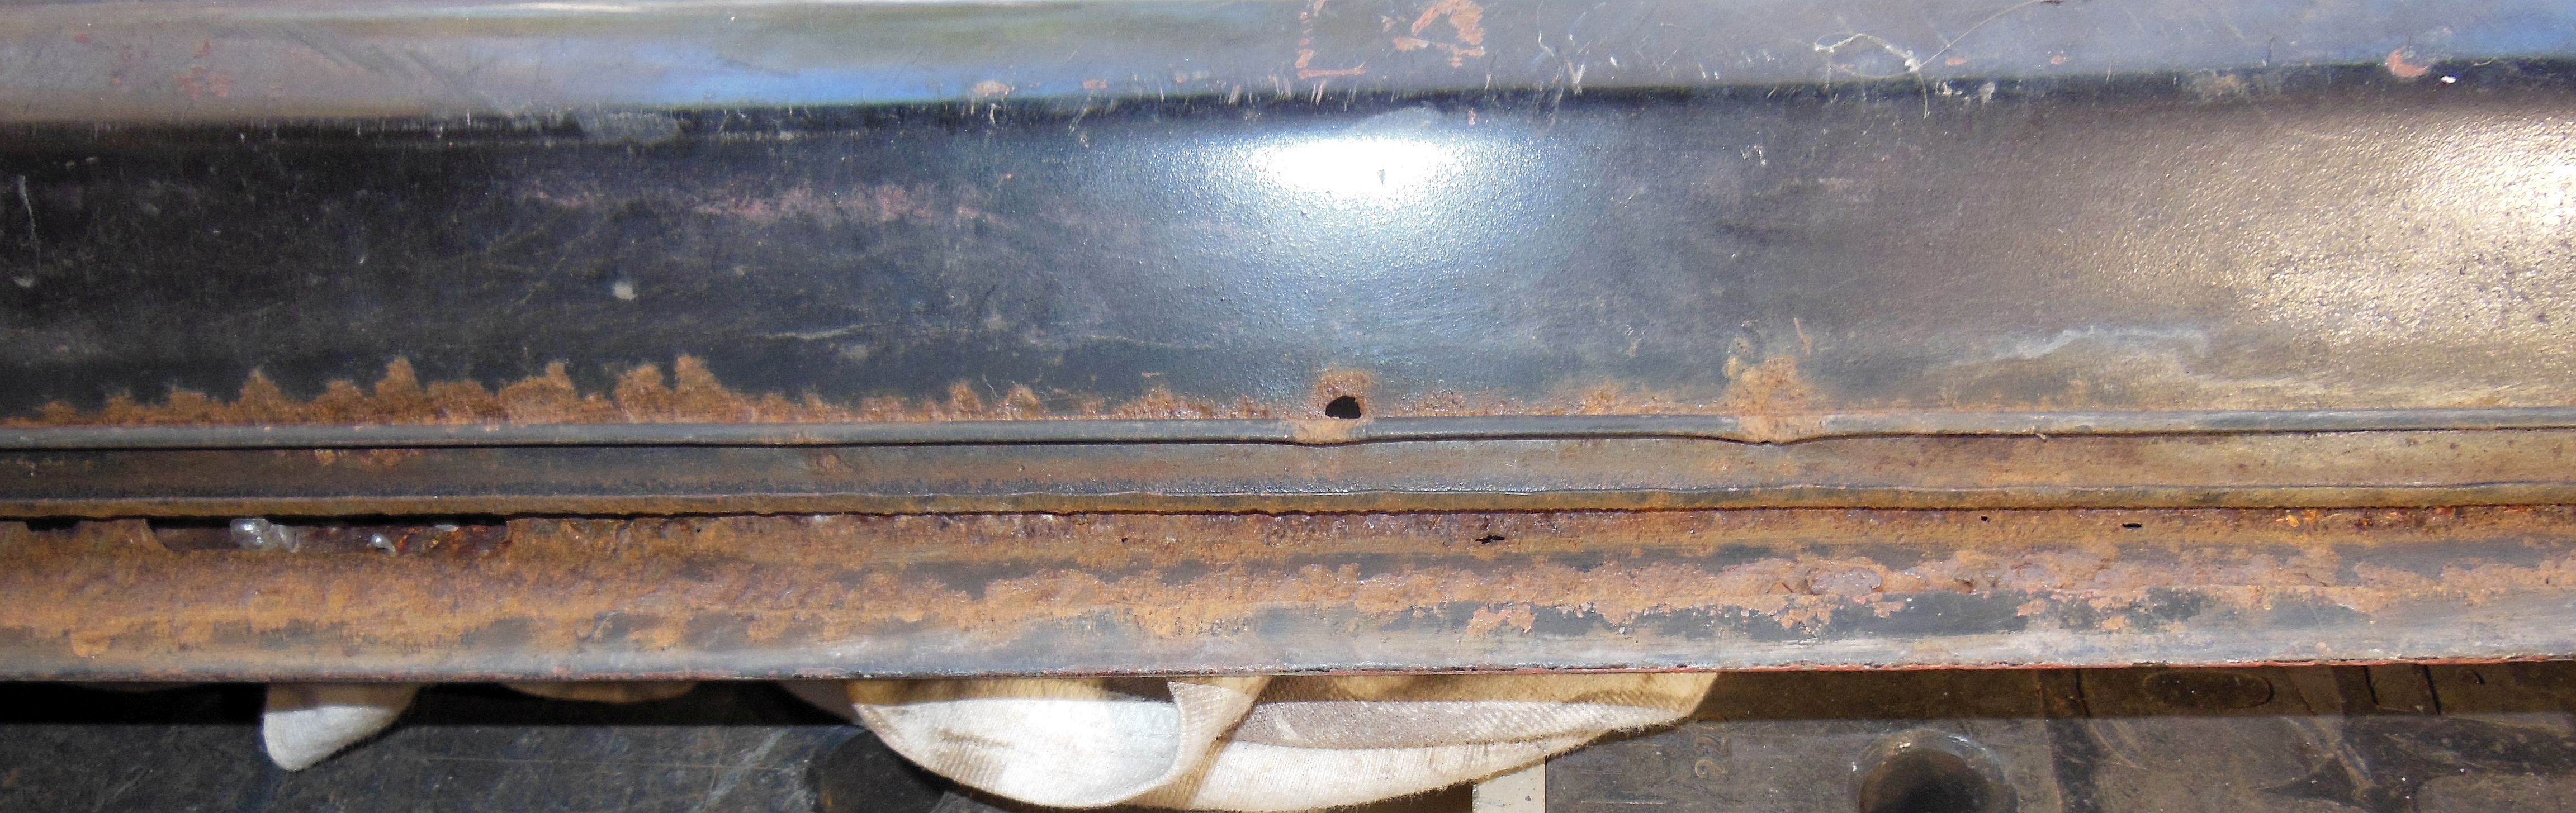
It's worse than it looks in this pic

In the pic above, this section didn't look that bad,
but the more I cut-out, the worse it got.

One of those “Didn’t-See-That-Coming” moments:  After I gleefully cutting away the inside lower lip and effectively detaching the inner support from the outer skin of the door, I noticed that the gap bowed out in the middle of the door.  Oops, so, which is the straight edge?  The inner support or the outer skin?  And how big should the gap be?  How am I going to measure it?  Bollocks!

This gap is WAY too big, I had no reference of the correct gap 


After a bit of head scratching, I figured that the door skin MUST be a straight flat line.  If it bows out, there is no way to fix it except to cut it up again and start over.  To guarantee that the outer skins is straight, I dug out a piece of square-stock and clamped it so that it forces the outer skin into a straight, flat line.  The bar closed the gap and straightened things, sorted!

The square stock ensures that the outer skin is straight
It also closed the gap

Some more pics of the other "blemishes."

A small rust through caused by water pooling under leaking seals
Not fixed yet

A rust through on the outer skin - not fixed yet
Door is upside down - this is the lower front corner

Blurry pic but you can see the cracks, a rust almost-through

Welded up - it will need some finishing
Boot Lid

The boot lid work is also on page Thirty-Four (November 14, 2022 post), but here it is again with a some new details.

The boot lid was riddled with cancer along the bottom edge and near the hinges.  It has also suffered a few blows over the years, but it’s the one that came from this car and its fit is virtually guaranteed.

Rust throughs at the corners

More rust throughs

Rust through the outer skin and inner support
It rusted along the bottom edge like the doors, but without a window feeding water to it, it’s not as cancerous, more pronounced at the lower corners where it has a couple of rust throughs.

The Fix

First the tried-and-true heat gun/razor blade trick to scrape off old paint and plastic filler.  Someone did some good work with the filler, but I’m not trusting old filler, and along with my bare metal policy, I want any filler to be as thin as possible, no filler poured over rusty metal.  Filler will only fill imperfections of my imperfect welds.

Patch welded in place


Grounded welds, ready for finishing

On the inside lower lip, I added a few strips of sheet metal but mostly welded up the rust through using welding rods and MIG wire and grinding away the excess. 

The holes in the outer skin, however, required fitting sheet metal to the holes.  I cut the holes into rectangles to ease the fitting.  Clean metal to clean metal made welding quick and easy without much heat soaking.

Make-shift stress crack puller.  The cracks are caused by forcing
the boot lid closed on stiff hinges - OIL THE HINGES!

Straightened (with help from the Stud Welder) and welded

Ground welds

Some JB Weld and they disappear
Since I was here, I restored the boot latch and its supports so that I can check the fit to the boot opening, the gaps and spacing.

Lower boot lid lip - sorted

Crackin' boot latch


Next up – sorting the engine compartment channel and fitting the bonnet.

Monday, November 14, 2022

Page Thirty-Four - Grounded


Alphie is off the spit, back on terrafirma.  Now the real the real bodywork begins, the stuff you can actually see.  The goal - paint in the Spring.

With the undercarriage painted, brake and fuel lines fitted (but not installed), it is time for Alphie to come off the rotisserie.  I didn’t install the complete suspensions however, only parts of them.  I planned for Alphie to sit a little higher than his natural stance because it means less leaning over while working, a solid goal, but...

I grabbed a set of leaf springs from the shed, disassembled and cleaned them.  I only needed the main springs since they will only hold the weight of the empty body shell.  When I say, “cleaned up the springs,” it took about two hours with a wire cup on the grinder, but they are rust-free, if slightly pitted, and black now.

Cleaned and painted - Main Leaf Springs in place.
U Bolts hold the 4X4 and a 2X6 that raises the back
to about the same height as the front 
Using the (also cleaned and rust-free) U bolts and plates, I mounted a 4X4 between the leaf springs.  To attach them, I drilled and cut slots for the U bolts because the 4X4 is wider than the rear axle.  A bit of a hack job, but functional.  Three sentences that took about four hours to pull off.  Now, Alphie’s front end.

Check out the 30-degree 2X4's

Ready for casters

Back in the summer, I disassembled one of the front suspensions in anticipation of needing it to put Alphie back on the ground.  The idea was to restore the front cross-member, have it all painted and slick, but not surprisingly, some of the bolts were so rusted that they sheared off, meaning there would be some drilling.  All the videos you’ve seen where some miracle gadget grabs a sheared bolt and neatly unscrews it, are all lies and miracle thinking.  Just drilling a hole in the middle of a sheared bolt is pure blind luck, and “easy outs” work about 1 in 350 tries.  I had to drill out the bolts with an oversized bit and re-thread them to next biggest bolt size.  I’m hoping the other front cross-member will not be as rusty, more miracle thinking.

I bolted on the unpainted cross-member and called it good.  The trick up front was attaching the 4X4.  To get a solid flat surface to attach the 4X4, I had to cut some funky diagonal (30 degrees as it turns out) wedges from a 2X4, which I mounted to the sway bar attachment points.  Maybe you have a table saw, circular saw or something else that can cut a nice 30-degree angle, but all my saws cut between 45 to 90 degrees.  Even with my minimal English-teacher math skills, I know that 30 isn’t between 45 and 90.  After a pile of failed attempts in the kindling pile, I finally found a way to prop a 2X4 so that the table saw would give me a 30-degree cut.

With my hard won 30-degree 2X4’s bolted to the cross-member, I screwed a section of 2X6 to them, and attached the 4X4 to the 2X6.  Attach the caster, and Bob is indeed your uncle!

Biggest Head Scratcher:  How to get Alphie off the rotisserie without dropping him?  Yeah, this took some innovation I wasn’t expecting.

I couldn’t remove the casters while Alphie was on the rotisserie, nor could I lift the entire car with my chain hoist.  I would have to lift one end, remove the rotisserie, block it at rotisserie height, move the chain hoist to the other end and repeat.  Oh, and to do this maneuver, Alphie needed to be in line with the I beam in my garage.  Easy huh?  Well, the 4X4 on the front end of the rotisserie broke when I was gingerly inching it in line with the I beam.  Normal stuff for me.

In-line with the I beam and propped up
I forgot to take pics of the intermediate steps, sorry

So, with Alphie stuck where I can only lift the front, I disassembled the front rotisserie and propped up his snoz on two foldable tables.  After some pondering, I figured out that I could swivel the butt a bit on the tables, lift the front, shift the tables back in place, swivel the butt a little more, repeat, repeat, until Alphie’s heinie was under the I beam.  Up goes the heinie, off comes the rear rotisserie, and I could switch the casters from the rotisserie to the new 4X4’s.  Progress!

Next Problem:  How to get Alphie to the ground by only being able to lift one end at a time?  Compound that with the problem of not being able to lower either end to the ground in one shot; I would need to lower both ends in stages.  Scratch, ponder, scratch…

Ah, move one foldable table to the back so that the front is on one table and the back on the other.  Lift one end and place a set of chocking blocks I had made when I first built the rotisserie.  The chocks are shorter than the tables, giving me my intermediate step to the ground.  Lower each end in stages with the chocks until everything is neatly on the ground.  Easy peasy, but it took all day.

Now, Alphie is comfortably earth-bound, and with the casters, is easily maneuvered around the garage.  Not quite as high as I wanted, but I can manage.

Grounded and highly mobile!
I can fit the doors, boot and bonnet lids and start the finish body work.  First up, the boot lid.  This is the kind of body work I've been dying to get to.  Steps that take Alphie clearly out of the grave!

Some pics...

I fitted the boot hinges so that I could check the fit, body gaps and what-not

Some rust-throughs that I cut down to clean(ish) metal

Alpine boots rust - a LOT!

All the way through!

Lowe's sheet metal to the rescue

Welds grounded.  It will need very little plastic filler now,
and it won't rust through again (for another 60 years, fingers crossed)

Alpine Owners - Oil the boot hinges so that this doesn't happen!
Don't slam the boot lid either!

Welded with a little help from the stud welder

Clean up the welds

A little JB Weld and the mend will disappear under paint

See below for more info about this pic

This last pic shows more work than is apparent.  First, all the rust-throughs have new sheet metal welded in, ground down and now filled with fiber glass reinforced plastic filler (but not sanded yet).  The latch mechanism has been cleaned, bead blasted, painted and installed so that I can better check the fit.  All the paint and an epoxy primer have been stripped down to metal.  


I am getting better with a hammer and dolly, hoping to, if not eliminate dents, at least reduce them as much as possible.  When I can't get the dolly under a dent, like the ones on top of the supports on the underside of the boot lid, I use my stud welder.  These dents will require filler, but very little of it.  I also plan to bring everything down to metal.  I don't want any old paint being pulled by the solvents in the new paint.  My goals: 1) As little plastic filler as possible in very thin layers, 2) Only bare metal, no old paint.  (I have more than 2 goals, but enough for now.) 


Pro-Tip:  You can spend hours and MANY sheets of sandpaper removing old paint - OR - you can take a heat gun and a razor blade and strip it to metal in a fraction of the time.  (Go slowly so that you don't gouge the metal.)  The heat gun will pull up the old plastic filler too, but for me, that is the goal.

Wednesday, October 5, 2022

Page Thirty-Three - Belly Pain


Before we start, many of you will say, “That’s Bloody Orange”.  Well, it’s not bloody orange -  it’s red bloody oxide, and as far as I can gather, that’s the color Rootes painted the bellies of Alpines.  Of course, then they slathered on a lumpy layer of asphalt undercoating, which did little to stave off the rust as Alpines tend to (make that, always) rust from the inside out.

Be that as it may, I finally painted Alphie’s undercarriage.  And for the record, it’s red oxide primer covered with a clear coat to make it all shiny.  I could spray on an undercoating to make it look more like it did when it sat in some dealership somewhere, and I still might.  Right now I’m enjoying the sheer cleanness of it!

I really am the one doing the work!

Last Minute Odds and Sods

Anyone who has ever painted anything on a car knows that when you think you’re ready for the paint, you’re not.  At about 3:00 am they day I was set to paint, I remembered that I had not mounted the seat belt anchors.
Seat belt anchors in the raw.
The original anchor eyebolts came out with the rotten floor pans.  Two of them, the ones next to the doors, clung stubbornly affixed to the floor pans.  They had rusted in so permanently, I quit fighting them and just left them in place.  Only a solid accident would dislodge them.  The other two, the ones next to the transmission tunnel, practically fell out.  These two had to be replaced.
I cut some 3/16” flat stock, drilled 7/16” holes in them, welded in 7/16” X 14 nuts and ordered two 7/16” X 14 eyebolts from Bolt Depot.  (The eyebolts were $8.45 each but they are shouldered and look almost identical to the original.  It’s only money, right?)
Anchors installed.  I forgot to take
a pic during the welding par
t
I drilled the holes in the floor pans and welded the anchors in place.  An easy job, but it ate up some of my painting time.

Clean Up

With the seat belt anchor job done, I wiped down Alphie’s tummy with denatured alcohol for the paint.  I started the “clean-up” about a week earlier.  The pics show some bright metal in the camera’s flash where I had ground off some rust spots.  The pics don’t show how much work it takes to get everything clean.  Truth is, I started the clean-up when I first skewered Alphie on the rotisserie. 

Red Oxide – I Swear

It’s not orange, I swear by Grabthar's Hammer, by the Sons of Warvan.  (Look up that reference!)  I did me research, which didn’t come to much.  I asked as many Alpine folks as I could.  I even posted a question on The Sunbeam Experience forums, but no one answered, what color did Rootes paint Alpine’s bellies?  Silence from the abyss, and the best evidence I had was the red oxide with clotty asphalt undercoating bit.  So that’s what I did.


OK, I admit, it looks pretty bloody orange.  The pics make it look
more orange than it is, I swear!

The red oxide was easy to spray – straight from the can, no reducer, no hardener, just pour and spray.  I was using a cheap Harbor Freight HVLP gravity feed spray gun, and it work pretty damn well, not Pebble Beach standards but who cares.  The primer was a bit thick and resisted running, but it did show me, that although I’m a passable spray gun guy, a professional somewhere will spray Alphie’s body.

Before the clear coat

Close up before clear coat

Because of all the horsing around with seat belt anchors, a spot I found that still had oily engine/transmission residue and a couple of other fiddly aggravations, I ran out of time before I could spray the clear coat. 

Clear Coat

Since everything was clean and ready to go, spraying the clear coat didn’t take very long.  In fact, cleaning the gun took more time.  The clear coat was also dead easy peasy.  Straight from the can, no reducer only 4:1 ratio clear coat to hardener.  This stuff was thinner so there are some runs, which you are welcome to scuttle under Alphie to find should you ever get the chance.  Besides we garage car painters call runs “signing our canvass.”

Clear Coated "BLING"
Big Step

With the undercarriage sorted, Alphie is ready for the next step – final body work.  Soon he’ll come off the rotisserie and onto a rolling pallet that will make fitting the doors, and bonnet and boot lids easier.  The goal is to have him in a paint booth somewhere by spring of 2023.

Thursday, September 1, 2022

Page Thirty-Two - Powder Coating!


I haven’t showed you guys this yet, but I have been powder-coating everything that fits in my garage oven for about 25 years or so.  Yeah, unlike normal people, I have a yard-sale oven mounted on the wall in the garage, just above the air-compressor, next to the bead blast cabinet.  Normal garage accoutrements.

What? You don't have an oven in your garage?

Today we’re coating the headlight buckets because I have new hardware for them from Sunbeam Specialties and because I wanna.  I also have the rear leaf spring shackles and a steering box mount that just happen to be ready and need to be black too.  We’re applying Eastwood Company’s powder coat primer and Mirror Black color coat.

Step One, Cleanage:  Powder-coated parts must be clean, surgically clean if you can get it.  Any dirt, old paint, rust etc. will bubble the powder-coat or prevent the powder from sticking.  Glass bead blasting makes things VERY clean.  It calms the obsessive restorer’s nerves.  After blastage, wipe everything down with lacquer thinner, and we’re ready.

(Short Technical Blurblet:  The powder in powder-coating is exactly that, a dry powder.  You stick it to the metal with electricity.  Attach the powder-coat gun’s ground wire to the victim and charge it with negative electro-bugs.  The powder-coating gun’s barrel charges the powder dustlets with positive electro-bugs, the negative electro-bugs attract the positive electro-bugs and Bob’s Your Uncle, a perfectly even coat of powder.  That’s why you can only powder-coat stuff that conducts electricity.  Also, since you slap it in the oven at 425-degree heat for about 20 minutes, the victim must be able to take the heat too.  Plastic, rubber, and such truck are out, sorry to say.)

The Victims - headlight buckets all cleaned and ready
Where was I?

Step Two, Primer:  You don’t always need to apply primer, in fact this is the first time I have applied primer, but it helps, and I’ll prime things regularly now.  BTW, it’s a powder primer.  It’s applied just like any other powder.

Sometimes imperfections in the metal, like ground in grease from sixty years on an old Sunbeam Alpine imbeds stuff in the metal that bead-blasting and lacquer thinner just don’t touch.  I have had powder refuse to adhere to spots for no apparent reason in the past.  The primer helps prevent that, and it gives you a chance the fix problems between the primer coat and color coat.

Primed!  They needed a bit of sanding before the color coat
Priming also gives a smoother color coat and deeper coverage.

Step Three, Perfect Color Baby:  Powder-coat is like the most awesome paint ever!  The shine is perfect – Eastwood’s Mirror Black is THE shiniest.  No drips or runs, just the smoothiest, most evenest coverage.

And it’s damn nearly indestructible!  You’ll learn how indestructible if you ever try to sand the stuff off.  It shines through gas leaks, brake fluid, thinners.  It doesn’t chip; it’s really hard to scratch, it even takes blows from dropped wrenches and whatnot.  Consider it permanent paint.  (If you change your mind about the color, you can paint over it, or re-powder-coat it, but that can be problematic.)

BLACK!  It's hard to get a pic of just how awesome the shine is
BUT the powder insulates against electricity.  If you need ground a powder-coated dingus, you must grind down to clean metal.  If you don’t, the ground will be weak at best.

Assembled with new hardware from Sunbeam Specialties
I love restoring stuff!